Picture this: You’ve just finished a photoshoot, and now it’s time for the editing process. You sit down at your computer, eager to turn your raw images into beautiful content and bring your vision to life.
Excited yet slightly nervous, you open Photoshop and start retouching your first image. Hours pass as you meticulously adjust colors, retouch imperfections, and fine-tune details. But just when you think you’ve nailed it, you realize something’s not quite right. You’ve gone too far or made a mistake, and now you have to backtrack and start from scratch.
Frustration sets in as you repeat this cycle—spending countless hours on a single image, only to end up back at square one. The struggle is real, and you wonder if there’s a better way to edit your photos without the constant fear of irreversible changes or wasted time.
Enter non-destructive editing—a game-changing approach that can save you from this cycle of frustration and wasted effort.
So, What is Non-Destructive Editing?
Non-destructive editing is a workflow technique that allows you to make changes to your images without altering the original image data. Instead of directly modifying pixels, non-destructive editing preserves the original file integrity by recording your edits as a series of instructions or layers.
Why Non-Destructive Editing Matters:
- Undo and Redo Freedom: With non-destructive editing, you can experiment with edits without fear of permanently altering your original image. Non-destructive editing gives you the flexibility to undo or redo edits at any point in your workflow. Say goodbye to the fear of making irreversible changes—you have full control over your editing decisions.
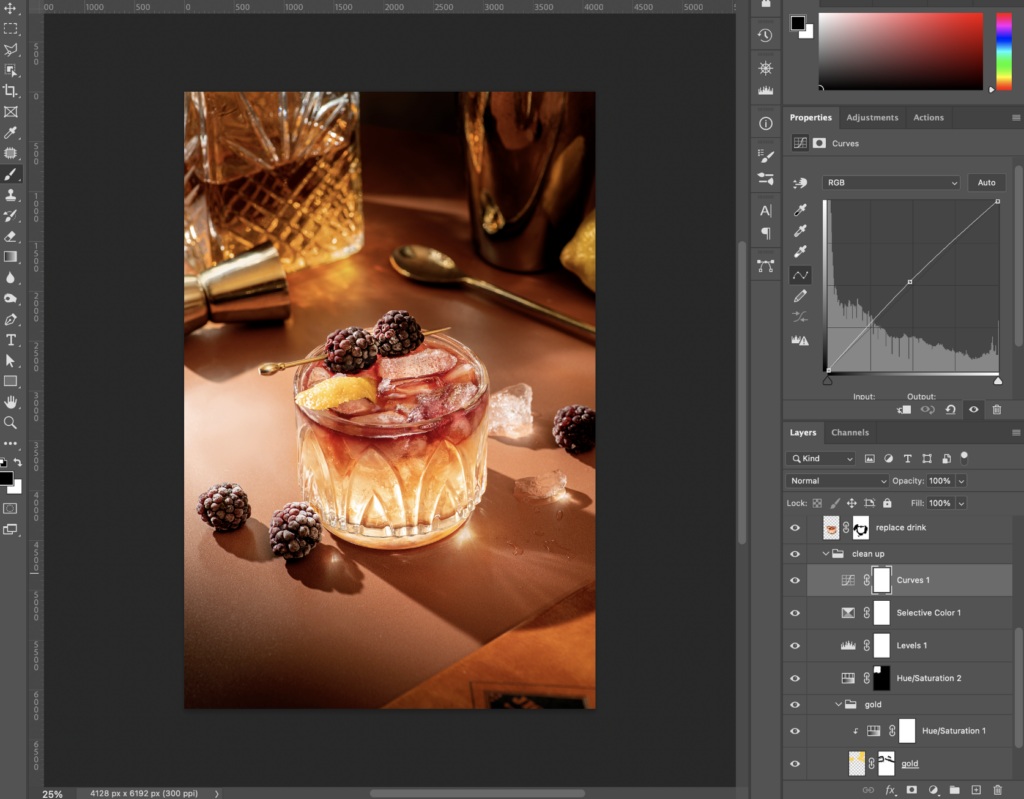
- Layered Approach: Non-destructive editing often involves using layers, masks, and adjustment tools. This layered approach allows for targeted adjustments, selective editing, and easy fine-tuning of specific areas in your images.
- Efficient Workflow: By working non-destructively, you can streamline your editing process. Make adjustments, compare versions, and experiment with different looks—all while maintaining the integrity of your original image data.
How Non-Destructive Editing Saves Time:
- Experimentation without Consequences: Want to try out different color tones, contrasts, or effects? With non-destructive editing, you can experiment freely, knowing that your original image remains untouched. No more worrying about irreversible changes or starting from scratch.
- Client Revisions Made Easy: Non-destructive editing simplifies client revisions. Adjustments can be fine-tuned or reverted quickly and easily because your file is neatly organized.
- Future-Proofing Your Work: Non-destructive editing future-proofs your work. As editing techniques evolve or client preferences change, you can revisit and update your edits without compromising image quality or starting from square one.
Tips for Non-Destructive Editing:
- Use Adjustment Layers: Explore tools like adjustment layers (e.g., Levels, Curves, Hue/Saturation) for non-destructive color and tone adjustments. Each adjustment layer allows you to make targeted edits without affecting the underlying image data, giving you precise control over your adjustments.
- Layer Masks: Learn to create and manipulate layer masks for targeted edits. Masks allow you to apply adjustments selectively, focusing on specific areas of your image. Use masks to paint in or out specific areas of your image, allowing you to focus on enhancing details, correcting imperfections, or applying effects only where needed.
- Work with Adjustment Layer Masks: Combine adjustment layers with layer masks for advanced non-destructive editing. Use adjustment layer masks to control where your adjustments apply, creating custom effects and enhancing specific areas of your image while keeping the rest untouched. This technique gives you flexibility and creative freedom in your editing process.
- Explore Blend Modes and Opacity: Experiment with blend modes and opacity settings to create unique effects and blend layers seamlessly. Blend modes control how layers interact with each other, while opacity determines the transparency of a layer. By adjusting blend modes and opacity, you can achieve different effects, blend multiple layers, and fine-tune the overall look of your composition.
- Use Smart Filters for Filter Effects: Apply filter effects non-destructively using Smart Filters. Convert your layers into Smart Objects and apply filters as Smart Filters, allowing you to edit or remove filters at any time without altering your original image data. Smart Filters give you the flexibility to experiment with filter effects while maintaining full control over your edits.
By keeping image quality intact, providing easy undo and redo options, and letting us fine-tune edits through layers and masks, non-destructive editing becomes the backbone of a smooth and efficient editing process.
But it’s not just about the edits—it’s about future-proofing your work, simplifying client revisions, and having the freedom to explore different creative paths without fear.
So, whether you’re a seasoned pro or just starting out, practicing non-destructive editing is key to growing as a photographer.
And if you’re ready to dive deeper and level up your editing game, consider joining my Photoshop course, Roadmap to Retouching. This comprehensive course will equip you with the tools, techniques, and insider tips to help achieve professional-grade results in your photography projects.
Happy editing!
+ view the comments


